2

There are a few things you can with your standard langstroth roofs to help keep the bees comfortable during a heat wave. There are also a few design modifications well worth considering when building your own roofs that may further protect your bees from the intense mid-summer sun.

Can't the bees just fan the hive to keep things cool?

Yes, they will certainly try, but as amazing as they are, even bees have their limits. If it gets too hot they will shut down brood production, and in extreme situations it is possible to lose colonies.

To get a sense of how hard your bees are working to keep cool, it's relatively easy to place a thermometer at your entrance(s) to gauge the temperature of the air being pushed out of the hive.

IMGP1869

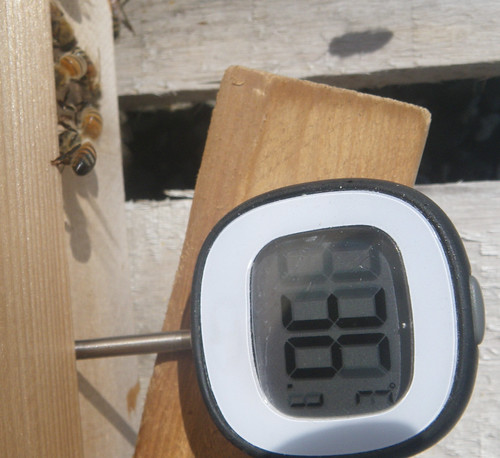
Keep in mind brood rearing requires a temperature in the 33-36°C (91 - 97°F) range. If your entrance temperatures are significantly above that, you may wish to take the temperature near the brood nest to see if they are winning the climate control battle.

Even when things are not too extreme, why not take a few simple steps that might save your bees from wasting time and energy?

Creating ventilation

Adding an upper entrance and tilting a telescoping cover back is certainly a simple way to offer some heat relief to a colony.

langstroth upper entrance with lid tilted back

Painting metal roofs white

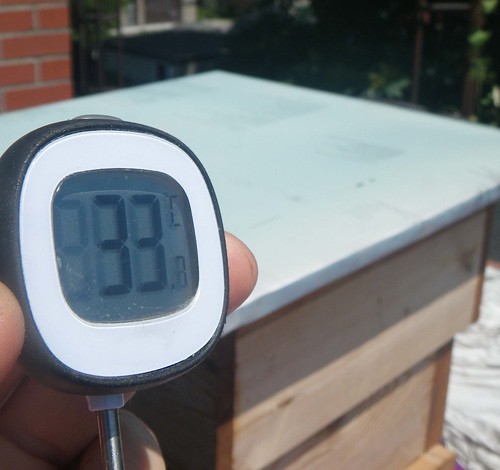
With the ambient temperature at 33.8°C (92.8°F), a plain metal covered roof was a very hot 46.1°C (115°F), while a metal rooftop with a coat of white latex paint was 38.3°C (101°F):

temperature of painted metal hive roof

Providing shade

In my region, it is generally advised to locate your bees in full sun. For those living further south, the conventional wisdom is to try and provide mid-day shade. If, like me, you have chosen a full sun location, you can provide shade only when the temperatures are unusually hot.

A simple, if temporary, way to add shade is to lay a few tree branches on top of your hive. I chose branches from a tree species known to be invasive in my area.

Using branches to provide the bees a bit of shade

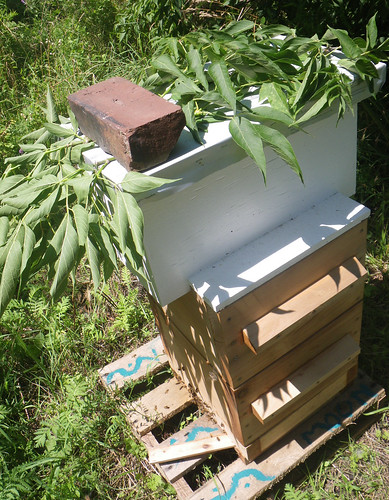
Within a short period of time, this dropped the temperature of my painted roof down 3.4°C to 34.9°C (95°F).

Of course, the leaves will soon dry out and shrivel. If you are experiencing an extended heatwave, you may wish to consider a more durable solution.

Build a double-level roof.

The idea here is that the top-level creates a solar shield that effectively shades the bottom level, while simultaneously creating an air gap through which a breeze can pass, thus minimizing thermal conduction of heat downwards into the hive.

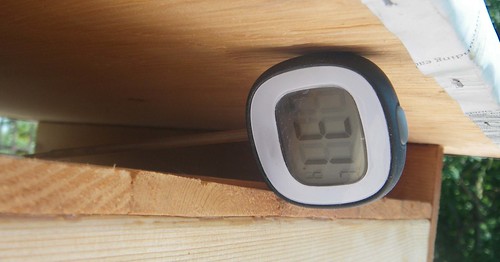
With the ambient temperature at 33.7°C (92.7°F)

Ambient temperature near the beehive

The metal covered, upper-level of the roof was 46.7°C (116°F), while the temperature below was a cool 31.4°C (88.5°F)

Temperture under a 'warre' style beehive roof with solar shield

The inspiration for this style of roof comes from the warré hive.

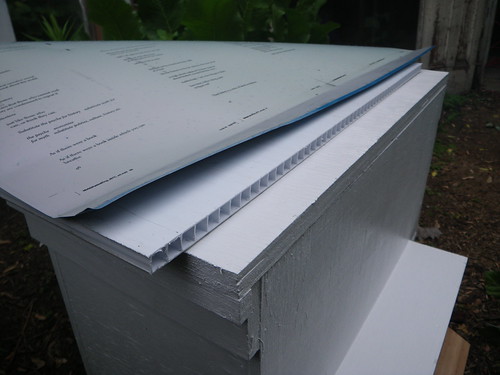
Build your roofs with corflute under the metal

Corflute is the kind of material election signs are usually printed on. The air pockets in the material help insulate and minimize thermal conductivity.

Using an old printing press sheet and coflute to protect the beehive from rain and heat

Use a Quilt or other form of insulation

A warré style quilt helps keep heat in during the winter, but it also helps keep heat from the sun out of the hive during the summer.

Thermometer

The thermometer I used throughout this post is a regular digital thermometer that one might use in a kitchen.

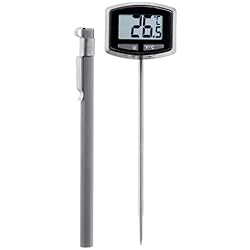
The main quality you are looking for in this tool is ability to adjust to ambient temperature relatively quickly. You can find one here on Amazon.

August 4

IMGP1951Photo by: Shawn Caza / CC: Attribution-NonCommercial-ShareAlike License

top nuc box - Only very small patches of brood remaining and lots of honey.

middle warré box - eggs as well as both capped and young brood.

bottom box - Six drawn combs. Not really being used for brood, but there were loads of bees.

In the bottom box I pushed four established combs to the edges and moved two brood combs down. One with eggs and young larvae. I left an undrawn comb in the centre of the middle box.

I was very distressed to find a couple of bees in the grass that didn't appear to be doing very well. It looked like k-wing, bloated abdomens and scruffy / greasy hair:

bee can't fly and looks like it's going baldPhoto by: Shawn Caza / CC: Attribution-NonCommercial-ShareAlike License

IMGP1967Photo by: Shawn Caza / CC: Attribution-NonCommercial-ShareAlike License

This one appeared to have a wound. Possibly from mites?

possible mite woundPhoto by: Shawn Caza / CC: Attribution-NonCommercial-ShareAlike License

And this one a deformed abdomen:

deformed abdomenPhoto by: Shawn Caza / CC: Attribution-NonCommercial-ShareAlike License

and ants were attacking this immobile bee:

weak / dead bee under ant attackPhoto by: Shawn Caza / CC: Attribution-NonCommercial-ShareAlike License

This left me suspecting problematic levels of varroa or tracheal mites or both.

There was a good amount of activity from healthy bees at the entrance:

Bees were spotted nearby foraging on astilbe:

honey bee on astilbe in torontoPhoto by: Shawn Caza / CC: Attribution-NonCommercial-ShareAlike License

August 6th

I returned with the intention of collecting bees with k-wing to dissect and look for tracheal mites. I did not find any. Just one bee with a deformed thorax:

honey bee with deformed thoraxPhoto by: Shawn Caza / CC: Attribution-NonCommercial-ShareAlike License

A few days later

The only bee I was able to spot in the grass flew away.

August 19th

All combs significantly filled out, but not 100%.

Only small amounts of brood in the bottom box, but lots of pollen.

IMGP2122Photo by: Shawn Caza / CC: Attribution-NonCommercial-ShareAlike License

IMGP2121Photo by: Shawn Caza / CC: Attribution-NonCommercial-ShareAlike License

Pollen frame 3rd from the west edge separating brood combs.

The middle box had a good amount of mostly capped brood:

IMGP2126Photo by: Shawn Caza / CC: Attribution-NonCommercial-ShareAlike License

IMGP2125Photo by: Shawn Caza / CC: Attribution-NonCommercial-ShareAlike License

They were starting to make some honey here.

We cut out a section of drone comb from the above frame, but did not find a high proportion of mites. Neither did we see any bees in the grass and the bottom board had been kept clean.

We added another skid below the hive to raise them up a little higher in case of winter snow drifts or flooding. We turned the top skid so there were no gaps for bees to fall through in front of the entrance. We also removed the eke that had been used to give the hive feed when we first set them up.

This is the first post for the wild heart hive. It is the open-mated offspring of the premiere hive.

July 24

I was surprised to see some goldenrod starting to flower here.

The bees appeared to have drawn the majority of two boxes of new comb and still had two boxes of capped honey from the spring. A solid brood nest seemed to have been established in the new boxes and the population looked strong.

IMGP1928Photo by: Shawn Caza / CC: Attribution-NonCommercial-ShareAlike License

At this point, I felt they had everything lined up to be strong for winter so I decided to do the first harvest. I removed the top box and tried out a hastily made bee escape that I had tried to make from a ventilation cover I had used when transporting the bees.

IMGP1927Photo by: Shawn Caza / CC: Attribution-NonCommercial-ShareAlike License

The multiple exit holes of the ventilation cover did not prove to be a positive feature for a bee escape. Some bees escaped but many bees crawled out one hole and back down another. I gave it a little while before resorting to a combination of smoke, waiting till dusk, and manually scooping out as many bees as I could. In the end the vast majority of the bees left. I will certainly try to make a better bee escape for next time.

I left them with a new box under-supered and seeded with two combs.

A final look at the combs from the bottom of the harvested box. You can see they actually made capped honey cells directly on top of other capped honey cells in the upper left hand corner.

IMGP1934Photo by: Shawn Caza / CC: Attribution-NonCommercial-ShareAlike License

For what it's worth I did measure some former brood comb after uncapping it.

IMGP1938Photo by: Shawn Caza / CC: Attribution-NonCommercial-ShareAlike License

This would have been some of the first comb made by the premiere hive swarm last spring. Ten cells average out to about 5.3 mm, but some of those cells certainly look to be around 5 mm.

I crushed and strained the honey. It took about 2.5 days of waiting to get the majority of the honey out of the comb and strained. I found it interesting to discover the moisture content of a sample taken from the top of the strained honey was right above 17.8%

refractometer reading from top of bottling tankPhoto by: Shawn Caza / CC: Attribution-NonCommercial-ShareAlike License

But the sample from the bottom was a little lower at 17.6%

refractometer reading from bottom of bottling tankPhoto by: Shawn Caza / CC: Attribution-NonCommercial-ShareAlike License

The more concentrated honey sinks to the bottom of a container. The readings were on the whole just under the acceptable limit for Ontario No. 1 honey. A damp spring probably contributed to higher than expected moisture levels for honey that came from 100% capped comb.

The result was a little over 30 lb of a rather magical flavoured honey.

honey jarsPhoto by: Shawn Caza / CC: Attribution-NonCommercial-ShareAlike License

August 11

Bees were pollinating the melon patch at the farm.

bee pollinating melonPhoto by: Shawn Caza / CC: Attribution-NonCommercial-ShareAlike License

and a fair bit of goldenrod in bloom around the hive.

warré hive in the fieldPhoto by: Shawn Caza / CC: Attribution-NonCommercial-ShareAlike License

This variety of goldenrod is blooming a little earlier than I'm used to seeing.

bee on goldenrodPhoto by: Shawn Caza / CC: Attribution-NonCommercial-ShareAlike License

It has a vibrant red / purple stem:

golden rod with pruple stemPhoto by: Shawn Caza / CC: Attribution-NonCommercial-ShareAlike License

They had built a good amount of comb on all bars of the new box.

IMGP2083Photo by: Shawn Caza / CC: Attribution-NonCommercial-ShareAlike License

IMGP2093Photo by: Shawn Caza / CC: Attribution-NonCommercial-ShareAlike License

They were using it for brood, some capped and loads of eggs on the outer comb:

honey comb full of eggsPhoto by: Shawn Caza / CC: Attribution-NonCommercial-ShareAlike License

The new queen seems to be vigorous and isn't having a problem laying all kinds of eggs.

The box below that was loaded with bees:

box full of beesPhoto by: Shawn Caza / CC: Attribution-NonCommercial-ShareAlike License

IMGP2100Photo by: Shawn Caza / CC: Attribution-NonCommercial-ShareAlike License

And lots of brood:

capped broodPhoto by: Shawn Caza / CC: Attribution-NonCommercial-ShareAlike License

The bottom box was not filled out with comb as completely as I had remembered thinking it was on the last check. All the bars had comb, but it appears that they had stopped building it, or using it for much. No sign of brood and little in the way of stores. Instead the bees prioritized building the new box above. This is a look as some of the combs I had placed aside in an empty box to make room while doing the inspection:

IMGP2097Photo by: Shawn Caza / CC: Attribution-NonCommercial-ShareAlike License

I'm still impressed with how much comb they have built. All of my weaker colonies have more or less put the breaks on comb production. It does seem to suggest that the summer slow period was not the best time to super and I will remain curious of what would have happened if I had nadired the new box on the previous visit.